All those symbols in the front of the multimeter got you confused? No worries! We’ve covered all that you need to know on how to use a multimeter to check voltage!
A multimeter is a lifesaver but it can be a bit tricky to use. All those numbers and symbols on the front of the multimeter aren’t for everyone to understand. But fear not!
We have made the usage of multimeter simple. You’ll not only be able to measure voltage but also use all the other functions of the multimeter in no time.
So, how to use a multimeter to check the voltage?
Using the multimeter is not hard at all! In order to check voltage, first, you need to turn off the power of the circuit that you’re working on. After that, you need to plug the wire probes into the multimeter which needs to be set to the voltage range. The black wire in the COM socket and the red wire in the mAVΩ socket. After plugging, attach the black probe to the circuit terminal and the red probe to the other terminal for the voltage source. Now, all you have to do is read the display.
This is only the gist of using a multimeter to find out the voltage. If you want an in-depth description of the steps of using a multimeter and its other features then spare a minute and read this article.
Related Reads:
How to Test a Thermal Fuse Without a Multimeter?
How to Test a Coil with a Multimeter?
Perfect Tool Belt for Cable Tech!
Let’s go-
How To Use A Multimeter?

When working with circuits and wires, a multimeter can come to the rescue with all the features it has to offer. So every household must have a multimeter. And if you know how to use the multimeter it’ll be a cherry on top of everything.
Before we dive into the instructions, let us first get familiar with some of the basics about the multimeter and its various functions.
What Is A Multimeter?
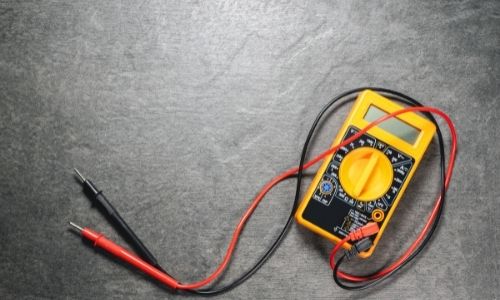
A digital device that measures the amount of voltage, current, continuity, and resistance. Some even have the facility of testing transistors and capacitors. It’s handy for people who like to troubleshoot electric circuits and fuses themselves. It’s also useful for the maintenance of a car battery. Having a multimeter saves you so much time and money!
Although there are many options out there in the market, here’s a list of the multimeter that we think will be best for you-
• AstroAI Digital Multimeter
• Plusivo Digital Multimeter
• Etekcity Digital Multimeter
What Are The Parts Of A Multimeter?
In order to know how to test with a multimeter, you’ll also need to know all of its configurations. Once you get the hang of the multimeter symbols and buttons you’ll be able to use them properly.

The Display
The LCD screen of the meter will show you the result of your test in digits. The screen usually displays 4 digits or 7 digits segments. Some of the meters have LED displays, which are suitable for all kinds of lighting conditions. These LED displays can show the symbols of AC/DC voltage measurements clearly. Most modern me=ultemetrs are made with LED screen nowadays.
The Selector Dial
The rotary range selector dial of the meter allows you to set the meter to the function you want to measure. There are two varieties of meter based on the type of dial-
• Autoranging meter
• Non-autoranging meter
The non-auto ranging meter helps you to set the rotary dial of the meter to a fixed range. On the other hand, the auto-ranging meter adjusts the range of the function for measurements itself. The range has a number of selections that will allow you to measure the amount of voltage, current, or resistance.
Connection Ports
There are 3 ports in a multimeter for the probes. Each of the ports has 4mm in diameter. The red and black probes are inserted in these ports. The three ports of the multimeter are-
COM port
COM refers to common. The ground wire or the negative wire of a circuit is always connected to this port. The black probe is usually connected with the COM port.
mAVΩ port
This port is used when measuring milliampere currents, voltage, or resistance. The red wire of the probe is plugged into this port which is connected with the hotwire or the positive wire of the circuit. This port measures current up to 200mA.
10A Special Port
The special 10A port is used only when we want to measure a big amount of current. Which means any amount greater than 200mA.
Probe
There are two wire probes that you need to use with a multimeter. All the ports of the multimeter are suitable for a probe with a banana end. The probes usually come in two colors. Although the colors don’t make any difference, the red probe tips/red lead is used to connect the hotwire or positive wire of the circuit. Whereas, the black probe is used to connect the negative or the ground wire of the circuit.
The probes of the multimeter come in various types. But there are some probes we recommend for you-
Banana To IC Hooks
These probes are best for small IC and IC legs.
Banana To Tweezers
These are only used for testing SMD (Surface Mount Device) products. This will help you for measuring voltage of certain points.
Banana To Alligator Clips
These probes are used for testing large wires or battery pins on a breadboard. These probes don’t require you to hold them. And so you can take as long a test as you want.
Banana To Test Probes
These probes can be used for any purpose. So they are also a cheap replacement for any broken probe.
Some of our favorite choices of test probes are listed below-
• Test Probes With Alligator Clips
• Kaiweets Alligator Clips Test Probes
• HANDSKIT Test Probes
What Are Voltage, Current, And Resistance?
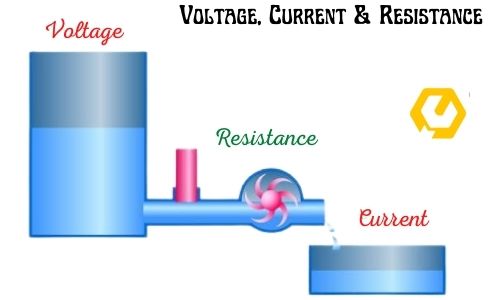
In case you haven’t heard these terms before, here’s a brief and simple overview of what these terms mean and why we need this for our instructions.
Current
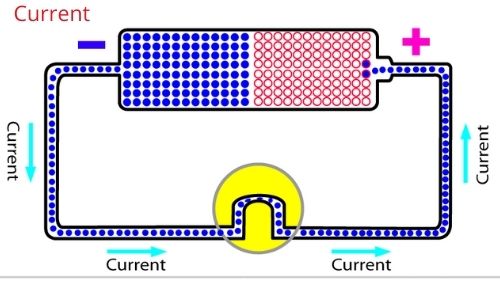
Current is simply the amount of electricity flowing through the circuit. The more the flow of electricity in the circuit the higher the current. The current is measure in amperes and the unit of the ampere is A.
Voltage
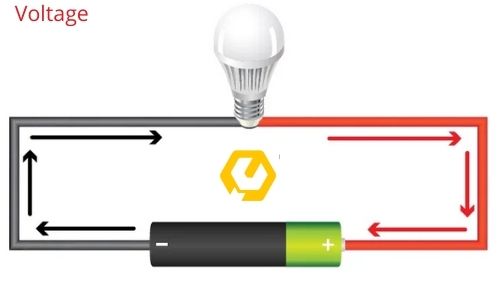
This is the amount of force a circuit requires to pass electricity. The force is measured as volts and the unit of the voltage in a circuit is V. So higher voltage means the amount of force in the circuit is more.
Resistance
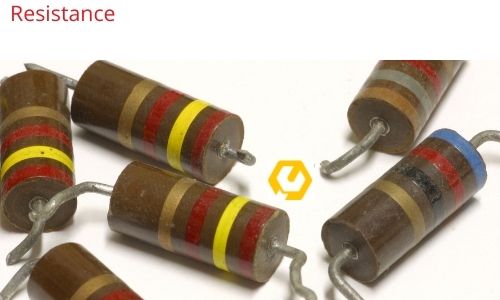
Resistance is the measure of how much an electricity flow is opposed in a circuit. This is measured as Ohms and the unit of the resistance in a circuit is Ω. This controls the excessive current flow of the circuit. As a result, the devices are protected.
What Are AC And DC?
DC and AC are other important terms you must be familiar with when dealing with a circuit. Even if you don’t you’ve got nothing to worry about. We got your back. Here’s an overview of AC and DC for your better understanding-

Direct Current (DC)
The current that flows in one direction is called direct current or DC. Every day AA battery, AAA batteries, and cellphone batteries provide direct current/DC.
Different kinds of multimeters have different symbols for measuring direct current and corresponding voltage. Some multimeters have DCA and DCV. And some have A and V with a straight bar (-) over them.
Alternate Current(AC)
Alternate current changes direction multiple times a second. Usually, a wall outlet of any house provides alternating current or AC. In the USA, the outlet current alters direction 60 times per second. And in other countries, the outlet current alters 50 times per second.
Different kinds of multimeters that measure AC or alternate current have different symbols. Generally, ACA and ACV refer to the measurement of an alternating current or corresponding voltage current. Some multimeters might also have the A and V with a wavy sign (~) over them.
If you are clear about the concept of voltage, resistance, and current (measure AC and DC both) then we can proceed to the steps of using a multimeter. But first-
How To Set The Multimeter To Check Voltage?
As we already know, a multimeter has multiple functions. And one of them is measuring the amount of voltage. But before you do that, you need to set the multimeter to measure the voltage.
To set up the multimeter to measure voltage, you’ll need to use the rotary range selector dial. You have to change the range whenever you want to measure and set it to current, voltage, or resistance.
In this case, you have to set it to voltage. If your multimeter is not auto-ranging then you’ll have to set the rotary multimeter dial to any of the given ranges. For example, for a DC volt function, there will be ranges like 1000V, 200V, 20V, 2V, and 200mV. If you want significant results from your test, make sure to set the function by the selection knob to the lowest range possible.
How To Use A Multimeter For Checking Voltage?
Now that the voltage setting of the multimeter is ready, we can proceed to the steps of measuring the voltage. So here’s a step by step guide of using multimeter tutorial-

Step 1
Turn the power of your circuit/wiring that you want to test off. This will save you from the power shorting of wires that were too close or terminals with differing voltage.
Step 2
In this step, you will need to measure with the black negative probe. Plug the black probe into the COM port/socket of the multimeter.
Step 3
Next, you’ll need to plug the red negative probe/red lead into the mAVΩ port of the multimeter. There will not be any difference if you swap the positions of the multimeter probes [black probe and red probe] except that the reading will be negative.
Step 4
If your multimeter is auto-ranging, then simply turn the rotary range selector dial/selection knob to the Volt setting with the symbols DCV/ACV.
However, if your multimeter is not auto-ranging then you have to manually control the meter to a range that gives you an accurate reading.
Let us simply put this-
Suppose you are measuring 14 volts with a 20-volt range. Your result/ reading will not be accurate. Because the result will have more decimals than when you will measure with the 200-volt range.
Step 5
When you are measuring voltage always remember the multimeter needs to be connected in parallel with the voltage source of a circuit.
And how can you do that?
Simply attach the test lead/probes to the voltage source or any two points of the circuit in a parallel connection. Make sure you take necessary precautions when you need to measure the voltage.
Step 6
This step requires extreme caution. First, connect the black probe/negative to the first point of the circuit wiring that you want to test. After this, turn the power of the circuit on very carefully. For the next step, you need to attach the red lead/positive probe to the other point of the wiring/circuitry.
Step 7
Note the reading on the LCD/LED screen.
Make sure the two points of which you want to check the voltage is not bridged. Especially in a PCB (Printed Circuit Board). Or else the reading of the circuit will not be accurate.
What Prevention’s Should I Take?

You know the drill about dealing with electricity. Caution is a must. If you want to avoid risk, we would suggest you follow all the rules strictly, because measuring DC and AC current is no joke. So while working with the multimeter, here are what you need to be aware of-
• Test leads [red probe and black probe]are not damaged.
• No exposed conductors.
• Test leads are connected properly to the circuit.
• Switch off the power or plug the neutral wire first.
• Set the range dial/selection knob currently and set it at the highest voltage range of the circuit.
• DO NOT measure the wall outlets with a multimeter.
People Also Ask About how to use a multimeter to check voltage

How do you reset a multimeter?
For this, you’ll need to set the dial to the highest range for measuring resistance, that is ohm. Next, you need to attach both the multimeter probes to each other. The display will automatically read 0. If not press the calibration knob until it does.
How do I test a breaker with a multimeter?
Testing the breaker with a multimeter requires you to need to turn the breaker switch of the circuit on. Then follow the usual guideline of checking the voltage of a circuit with the probes.
How do you check 12-voltage with a multimeter?
Before measuring the voltage you need to set the range of the multimeter accordingly. Setting the meter for 2V means you can only measure up to 2V. So if you’re trying to measure 12-volt with a multimeter you need to set the range for 20V.
Signing Off

By now you should know how to use a multimeter to check the voltage. You can also try out the other functions a multimeter provides. But we want you to take all sorts of necessary measures to avoid possible accidents. Safety will ensure better efficiency.
Let us know if you’ve been able to measure the voltage by leaving a comment below!
Till then stay safe!
